Furoshiki - More Tutorials here on Japanese

I am in love with this! Seriously! It's easy, elegant, and gorgeous. I will be posting more tutorials here on Japanese Furoshiki...this is just the beginning!

You will need:
Square piece of fabric

That's it! Yes, I promise, that's it. :)

1) Spread out your piece of fabric to look like a diamond in front of you.
(I'm sorry for the horrible wrinkles! I was in a hurry and didn't have time to iron it)

2) Put your gift right smack in the middle.

3) Take two opposite corners, bring them to the center and tie a knot.


4) Bring in the other two ends and tie those too. (Tuck the ends of the first knot under the new knot you are making.) If the ends are too long, or you want to make it more secure, tie the ends again


5) You're done!

Grocery paper bag gift wrap

Ok, I loooove making stuff out of grocery paper bags. I have a bazillion of them because that's all I use when I grocery shop (I am too forgetful to take the reusable ones). And because I have so many of them, I can't get myself to throw them away :( So I make stuff with them.

If I have to mail out a package, I bet you anything it's going to be wrapped in a paper bag.

 If I wait till the last minute to wrap a gift and find out I have no bags, it's gonna be a paper bag for sure.
 I love the versatility of it. I can do whatever I want, cut it into whatever shape I want, and feel good about recycling!

So here we go:

  • Materials you will need:
  • Paper bag
  • Scissors
  • Sewing machine (or thread and needle)
  • Whatever you want to decorate with

1) Cut out the bottom and sides so that you are left with two big panels:

2) This next step will really vary according to the size of bag you need. I needed a small one, so I took a panel and folded it in half. And half again. And I was left with this:

Note: I like when the bag is a big crumbly. It adds the character I want. But if you want the crisp bag with not one crease on it, make sure you pick a nice bag and be very careful as you work with it.

3) Ok, next I wanted to make the opening. I took the side of the bag that has the opening and folded the corners like so:

4) Cut off the big you folded AND cut the bottom flap off too. So you will be left with this:

5) Now run to your sewing machine! Stitch all around your bag (don't forget to backstitch). I even stitched around the flap (just make sure you don't sew it shut!)

6) Now, you get to decorate! Waahoo!
I chose to keep it simple because the recipient of this gift is a very simple person. I always try to choose styles and colors according to the gift-ee's preference. It just makes it that much more personal.
I stamped it with a leaves stamp I had on both the front and back.

7) I popped my gift inside, added a raffia bow and closed it with a dab of hot glue.

It's super easy and it makes for a wonderful gift!!

I got a sweet tutorial for you today!! It's super easy and it makes for a wonderful gift!!
It's super easy and it makes for a wonderful gift

I have seen several of these roaming around blog land...I just had to make my own cos they are jaw dropping :) What I like about this one is I made the flower interchangeable. That way, you can change flowers to coordinate with your outfit or wear it without a flower at all. We are women...one day we like something, the next day we don't! So it made sense to make this necklace to change along with my mood!

Onward to the tutorial!

What you will need:

(All of these things are in the jewelry section in Walmart or Joann Fabrics)

  • Wire
  • Glass pearls
  • Clasps
  • Crimp Beads
  • Pliers


All of this stuff is relatively cheap...and since you get quiet a bit of crimp beads and clasps, you will have enough for many necklaces.

Ok let's get started:
1. Measure the length you want for your necklace. It's your preference how long you like it :) and add an inch or two so you have enough wire for the clasps
2. Grab an end and bead a crimp through first, then the clasp like the picture shows

3. Then you will bring the wire back around and through the crimp once again.
4. Close out your crimp with the fliers. It's helpful to have pointy pliers here. Also be careful not to do it too hard or you might cut the wire. But you wanna make sure it's hard enough where the wire won't come off.


4. Put your beads on and close out your necklace in the same manner as you started it.

By now you should have this:

Add your pretty flower and voila!

Here's the back so you can see how I attached it. These  pins are also in the jewelry section. I just hot glued them on the back - they come on and off in a snap!

Sweetness

I just wanted to share this gift my sister made for me a while back. This has by far been my favorite gift. It's handmade life and it's obvious it took a good chunk of time to make. I love it. And it means so so much to me. I carry it in my purse most of the time so I can sneak a peak and read a verse whenever I can.
Sweetness

She took a recipe book from the Martha Stewart line... I believe she got it from Target if I remember correctly. And with some scrapbooking paper, she made a tag with the printed Psalm to cover a "Recipe" title that was originally on it. Then inside she hand wrote her favorite scriptures on each card.
Sweetness

Isn't it a lovely idea? So personal and meaningful. It made me cry when I opend it. I love my sister.
There are many ways you can fit this idea to whatever you want...you can write quotes for a quote lover. or actual recipes! Or things you love about them!

Thank you sis! I will cherish this gift forever!

Gift Card Holder

 I like gift cards. No matter how impersonal they are; I still to receive em'. Although, I hate to give em' because of how impersonal they are...I'm a weirdo.

So here is a tutorial. It can be used for a tiny gift such as a ring or necklace. Or as a gift card holder. Either way, it's cute. And it makes you feel less guilty for giving such an impersonal gift! Afterall, you took the time to make the holder! Did I mention it's cheap and it's done with what you have at home? Can't get any better than that.

You will need:
  • Toilet paper roll
  • Your choice of scrapbooking paper (4x6)
  • Glue
  • Crop-a-dial or hole puncher
  • Ribbon

Gift Card Holder

1. Flatten your tp roll (I use a bone folder for the edges)

2. Glue your paper all the way around the roll and attach clips to ensure it sticks good

Gift Card Holder

3. Trim any excess roll on the edges

Gift Card Holder

4. Take your crop-a-dile and make 5 holes (I eyeball the distance between each hole)

Gift Card Holder

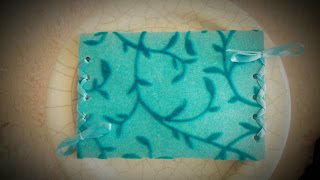
5. You can lace up the ribbon however you like. I lace each side twice -so I end up on the same end I started from.

Gift Card Holder

6. Tie a bow and do the other side (don't forget to put your gift in first!)

Gift Card Holder


And you are done!
Gift Card Holder

Or you can add a little flower
Gift Card Holder

Pretty Platter Reveal!

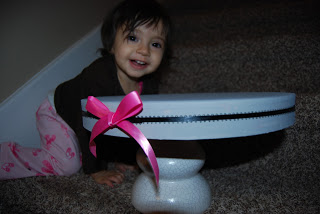
Ok, remember that little platter I saw at TJ Maxx that was totally screaming for me replicate?!?!!? No? Well then, click HERE. I've been working on it since yesterday and it's finally complete! And I am in love :)

This is the result:

Pretty Platter Reveal!

It's extremely simple to make and I did it with everything I already had at home. The bottom is a candle holder that I got on sale for $3 a while ago. The top is the cover to a hat box I have had for years. The rest is ribbon, paint, and glue!
Pretty Platter Reveal!

1. I primed and painted the top. Even though I primed it, it still took several coats.
2. I used E400 glue to attach the base and top together...let that dry for 24 hours.
3. I wrapped some ribbon around it and added a bow.

THAT'S IT!
What I love most about this baby is the versatility! I can change the colors of the ribbon to match whatever I want. This means I could use it for any party my heart desires and have it match the color scheme. I like that. I like that a lot. And instead of the bow, I can put a pin wheel...or flowers...or nothing!

Here it is again - although it pales compared to the beauty of my princess.

Pretty Platter Reveal!

She was so intrigued by this platter. She kept giving it kisses. She approves!

Can't you just see this little beauty with cupcakes on top? I can. If you love cupcakes at parties, you will love the Lovely Paper Blog. She has the template to the most gorgeous cupcake liners you can make yourself. You just print the template, trace it on pretty paper, cut, glue together, and place a cupcake inside! It completely transforms that little cupcake!

Oh, Christmas tree!

Good morning lovelies! I was thinking yesterday that my home is really lacking Xmas decorations. We put up our tree last week but it's just not cutting it! So while I was in my newly remodeled bathroom waiting for my princess in training to do her business (tmi?), a light bulb went on in my head! I have been wanting those beautiful xmas trees everyone in blog land is making. There are some AMAZING trees out there! So, in keeping with my vow to use only what I have at home, I made this little baby:

Oh, Christmas tree!


With toilet paper :) hehe. I didn't have a foam cone in hand- and I wouldn't really want to pay $4 for one. What's the fun in that! So I made my own with cardstock. You can print a cone template here (no need to punch in holes) Just print, trace, cut, and tape the ends together.

The I took a TP square and grabbed it from the middle in pinched it like so:

Oh, Christmas tree!
Then you dab a bit of hot blue on the tip you are holding it from and glue to the bottom of your tree. You just work your way up from there. Make sure to put them close enough to cover the cone. The more you fit on there, the fluffier it will be!

Here it is sitting all white and fluffy.

Oh, Christmas tree!

Or, you can rub an ink pad all over it like I did and add color to it. I felt like it was missing something, so I made a star out of paper and covered it with red fabric and attached it to the top with hot glue.

Oh, Christmas tree!
You can do all kinds of stuff to this little tree...if you have spray glitter you can glam it up. Bling it up with fake little diamonds. Or make a cute little tiny garland to go around it. Whatever your little heart desires.
Total money spent on this project: $0
All you need is cardstock, one tp roll, and a hot glue gun.